
APERTURE (a recap w/ goodies)
Before I move on to Shutter Speed next week I wanna recap Aperture for the understanding of exposure and composition.
Before I move on to Shutter Speed next week I wanna recap Aperture for the understanding of exposure and composition. Hopefully the selected infographs I pulled from the internet should be of assistance. Next week: Shutter Speed in Understanding Exposure. Until then, please save these as useful tools to help you start your photography journey and on that note I’d call Aperture done and dusted.


Understanding Exposure : Aperture 101
The series of Understanding Exposure trucks on with this installment: Aperture.

The series of Understanding Exposure trucks on with this installment: Aperture. As an appetizer let’s take a quiz. I have three questions, answers below (no cheating), you get them right… you pass the quiz and read no more. You get so much as one wrong, you go back and read this entry. Deal? Deal. Let’s go!
What is the f-stop number when stopping down two full stops from f/5.6?
a. f/2.8
b. f/8
c. f/11
d. f/7.2The near and far points from the fixation point encapsulate an area called “The ___________________ .
a. Depth of Focus”
b. Circle of Confusion”
c. Depth of Field”
d. Fixation Point Distance”The creamy silky background blur behind your subject is pronounced _________.
a. Bo-Kuh
b. Bo-Kah
c. Bo-Keh
d. Boke…like Coke
Let’s get down to the lesson shall we….
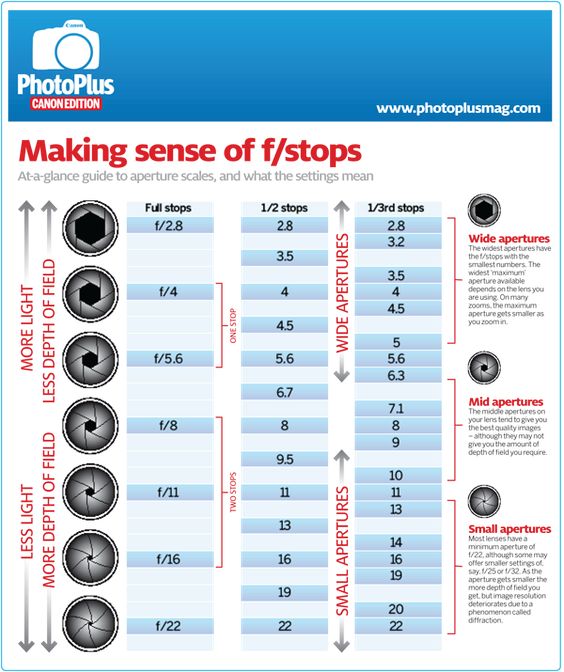
Stops , F-Stops , Stopping Up, and Stopping Down
To begin with, the “f” in “f/8” stands for “focal length”. If you replace this f in the fraction with the value of the focal length of the lens you’re using, you will get the diameter of your aperture. Let’s say, you’re now using an 80mm lens. If the f-stop you want to choose is f/8, you will get the fraction 80/8. 80 divided by 8 is 10. So the opening in your lens is exactly 10 millimeters across. If we had a 50mm lens and an f-stop of f/1.0, our aperture would be 50 millimeters across. In other words, its diameter would be equal in length to the focal length of the lens.
Here, though, it’s important to distinguish between the diameter of the aperture (measured in millimeters) and its area (measured in square millimeters). If we choose f/1.4 on that same 50mm lens, the diameter of the aperture will get smaller by a factor of 1.4 but its area will be reduced by a factor of 2. This might sound complicated but you don’t really need to think about it. What you should know, however, is that by changing the aperture by one stop we either reduce or increase the amount of light by a factor of two. So, if we stop DOWN the lens from f/4 to f/5.6, we allow twice as little light. If we stop UP the aperture from f/5.6 to f/4, we double the amount of light.
The range of f-stops a lens supports is f/1 – f/32, consisting of the following f-stops:
f/1,f/1.4,f/1.8, f/2.0, f/2.8, f/4, f/5.6, f/8. f/11, f/16, f/22,f/32

Depth of Field and Aperture
In short, depth of field (DOF) is the distance between the near point and the far point of the fixation point were objects in your image are acceptably sharp. It’s measured in feet or meters.
The depth of field can be shallow (narrow) or large. When it’s shallow, just a small part of your photograph appears sharp. When it’s large, a great area of your image is in focus.

How does aperture affect depth of field? The chosen aperture value (or f-stop number, as it’s called) directly affects the depth of field in your image. The lower your f-stop number, the shallower the depth of field. At f/1.8 for example, only a part of your object of interest will appear sharp. The rest of the photograph will be blurred.
Bo-Bok… Background Blur
I threw this in the lesson because there seems to be a misunderstanding on the proper way to pronounce the name used for background blur. The name itself originates from Japan and the syllables, consonants, and vowels offers some confusion hence why people say Bo-Kay or Bo-Kah when Bokeh is actually pronounced Boh-Keh. Good Bokeh is soft silky background when using a shallow depth of field on a wide aperture (f/2.8 on up).
ANSWERS: Confucius say; in multiple choice always choose “C”. 1.C 2.C 3.C
In Closing
I want to thank you for swinging by the week. Today, tomorrow, and Saturday are going to be a little hectic as I’m going on vacation. I’ll say now that I make no guarantee of a blog this next week, but I’ll do my best to get one out. Flickr Friday happen regardless as I have some shoots planned for Project 116*3. At any rate, see you all tomorrow for Flickr Friday. Cheers!

Exposure and the Human Eye + Project 116*3 (Intro for the uninitiated)

I want to start with the absolute basics for those of you reading with no prior or any knowledge of photography. Sit right down there and hopefully (if I explain things correctly and thoroughly enough) by the end of “Understanding Exposure”, an off and on series, you’ll understand exposure and the key components that go into exposure thus creating a photo. By extension, with no guarantee, you will most likely take better photos knowing these components.; at the very least experiment more thus creating more engaging photos. So, let’s get into the basics!
Exposure has three key components to it; Aperture, Shutter Speed, and Film Speed. All three components factor light coming in; the aperture for the amount through the lens, shutter speed for how long the light comes into the camera, and the film speed (going forward it will be called ISO) which measures the sensitivity of that specific film or sensitivity of the sensor at that measured setting. So let’s use this idea in practice, and many of you may not have a camera on had but you don’t need one for this example, you just need to understand you own eye.

If you shine a bright light at an eye, though I don’t suggest doing this to a random person’s eye, you’ll notice how the pupil contracts limiting the newly added amount of light in. If our eyes didn’t contract, the amount of light would blind us by bathing the entire vision in whiteness.
Our eye can and do compensate however and so our pupil contracts and the vision isn’t whited out very long. The same can be said for the opposite, when wondering around in the dark with no or low lighting our eyes will compensate for the lack of light and let in as much light as possible to create a visible scene. If our eyes didn’t adjust ever we would, for example, walk into a dark theater from the lobby or outside and constantly bump into things it would be too dark to give vision.
The camera’s lens functions the exact same way. Sure it has some advantages and hurdles when dealing with a wide or narrow aperture but dealing with the amount of light and having the lens control it is the same as the involuntary action of the pupil. You can even know what happens if the aperture is too narrow or wide, given the shutter speed and ISO are all set properly. Too wide? Then the exposure will be too light. Is the image too dark? then the aperture is too narrow. All these are, again, if the shutter speed and ISO are set properly. The shutter speed simply is the blinking of the “camera’s eye”. The faster the camera “blinks” the darker the image is, and the longer the cameras blink stay open, the brighter the image will be. Like the Aperture the shutter speed is dependent in the Aperture and the ISO. I’ll get more into the ISO in the blog entry for “Film Speed” but for understanding purposes of the human eye and understanding exposure, think of the ISO as the retina in the back of the eye. It is a light sensitive sensor that needs the eyelids for “shutter Speed” and the pupils for the “Aperture” to best make a visible image. I’ll get more into each topic, trust me I couldn’t scratch the surface in one blog if I tried, but for now you have a better understanding of why an image would be to dark/light. Keep in mind it’s sometimes just one of the three factors but a general dark image is a combo of all three. So join me in future posts as we dive into these subjects, and you too can learn photography…
Now on to another topic.
Project 116.
A photographer I followed for the first couple years of learning photography wrote in a website she made about the first camera she ever owned:
”I spent almost a year shooting exclusively with the 50mm f/1.4. I couldn’t afford another lens, so I just had to make do with what I had. I think this forced me to learn the basics of photography (exposure, light & composition) and really know how to use my camera.” - Lisa “Mostly Lisa” Bettany
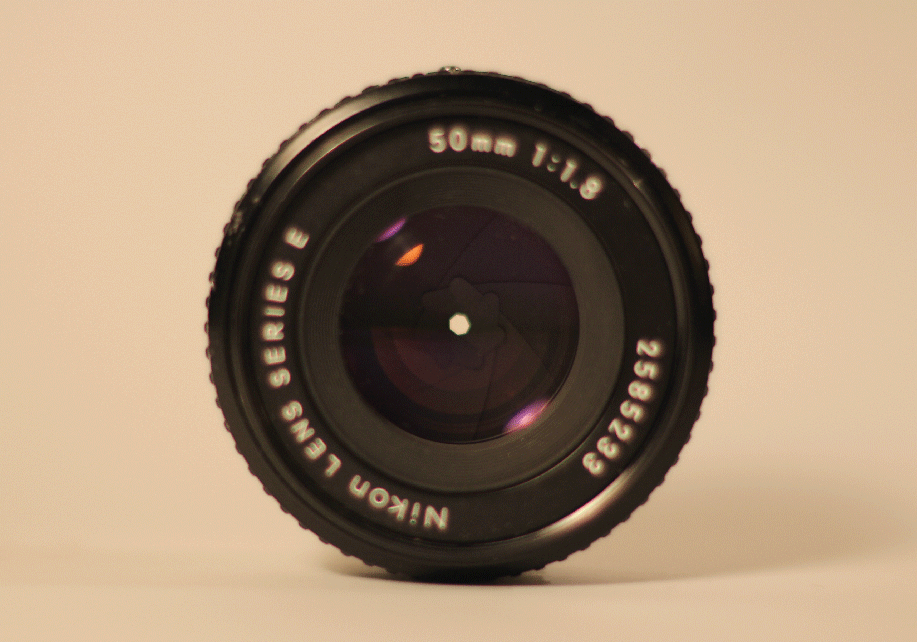
It made me think about the constant influx of gear I’ve had come and go with little work to speak of other than the work I brought it for (this was before the popular rise of lens rental sites"). I needed a way to celebrate what gear I bought and why I loved these specific lenses or cameras. So, project 116 ( 1 camera, 1 lens, 6 months) started with my first lens I ever bought “50mm f/1.8”. Now in this third installment I have decided to go with another zoom lens (116/2 was the 17-40mm Super Wide Zoom lens) the “Canon EF 24-105mm f/4 USM L” lens. What better way to celebrate this than with a camera fresh from the Canon repair wing, the EOS 5D mk II. Now I know for a fact that I won’t be using the 5D mk II won’t be brought on my trip in a month, so while Project 116 has been very flexible, with the one exception, I want to be a little more strict with just the 1 camera. Previous installments bounced the same lens on two to three different bodies, but this time will be a little different, and I’m excited to show you all next Flickr Friday the inaugural post. this will go on once a week every Friday for the next 6 months, so see you all then. Until next Thursday, thanks for swinging by!
